|
This document introduces you to the tools that enhance
navigation between the pages of your site. These are:
- Redirect URL to redirect visitors from one page to another;
- Directory Indexes to specify what
files will be treated as index pages;
- Error Pages to configure error pages that are
shown when the requested pages fail to open;
- Server Side Imagemap to add links to parts of your images;
- MIME Types to specify the MIME type for a particular file extension.
- WAP Support to configure Web server be able to serve WML pages or WMLScripts
Redirect URL
Use this feature to redirect your visitors from one web
page to another or even to a different website.
To create a redirect in a Unix-based account, do the following:
- Select Quick Access in the Account menu.
- Click the Web Options icon.
- Click the Edit icon next to the domain you need.
- On the Web Service page, scroll down to find the
Redirect option and click the Add icon next to it.
- Agree with the charges.
- On the page that appears, create the redirect rule.
Unix-based accounts
Entering http://www.examples.com/products
into the Redirect from field and
http://www.examples.com?param1=yes
in the to field, will take all the
http://www.examples.com/products
visitors to the http://www.examples.com?param1=yes page.
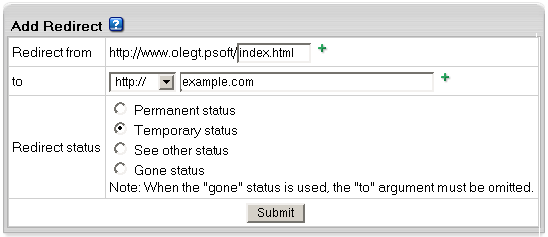
If you leave the Redirect from field empty,
visitors will be redirected from any location in the site.
In the to field, you can enter URLs with parameters,
as illustrated in the screenshot above.
Leave Redirect status as is unless you want to change the default:
- Permanent
returns a permanent redirect status (301) indicating that
the resource has moved permanently.
- Temporary
returns a temporary redirect status (302). This is the default
and indicates to the client that the resource has moved
temporarily.
- See other
returns a "See Other" status (303) indicating
that the resource has been replaced.
- Gone
will cause a visitor's browser display "The requested
resource is no longer available on this server and there
is no forwarding address. Please remove all references to
this resource." message when trying to go to the 'to' URL..
Windows-based accounts
In Windows plans, redirect works in a slightly different manner:

- The exact URL entered above
redirects requests for any files in the indicated directory to one file. For example, to
redirect all requests for products.html file to the following URL: 'www.example.net',
enter www.example.net/products.html in the To field and select this option.
You can redirect requests to URLs with parameters, for example www.examples.net/?param1=yes
*Note: you can redirect requests for files and directories both to your
own site and to any other external URL.
- A directory below this one
redirects a parent directory to a child directory.
- For example, to redirect your 'examples.net/products'
directory to a subdirectory named 'news', enter
'excample.net/products/news' in the 'to' text
box and select this option. Without this option, the Web
server will continually map the parent to itself.
- A permanent redirection for this resource
sends the following message to the client: '301 Permanent Redirect'.
Redirects are considered temporary, and the client browser
receives the following message: '302 Temporary Redirect'.
Some browsers can use the '301 Permanent Redirect' message
as the signal to permanently change a URL, such as a bookmark.
Directory Indexes
This tool allows you to set your own index pages
instead of those specified in the default settings.
In other words, you can tell your visitors' browsers which
page to load as they hit your domain. Usually, it's
/index.html by default, but you can set any other
custom welcome page.
Example: If a visitor goes to your site http://www.example.com,
the first page to open will be http://www.example.com/index.html.
However, if you set /welcome.html as the directory
index, the page to open will be http://www.example.com/welcome.html.
Warning: your custom index pages won't add to the defaults; they will
replace them. Therefore, make sure to enter the full list of indexes you would like
to have in your configuration.
To set your custom directory indexes, do the following:
- Select Quick Access in the Account menu.
- Click the Web Options icon on the page that shows.
- Click the Edit icon next to the domain you need.
- On the Web Service page, scroll down to find the
Directory Indexes option and turn it on.
- Agree with the charges.
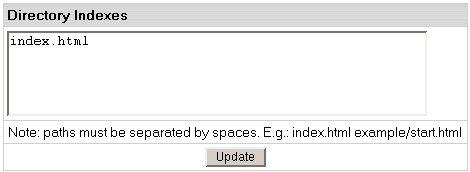
- In the box that appears, enter the names for files
that will be treated as indexes. Put file names in the
descending order of priority and separate them
with spaces (e.g. index.html cgi.bin about.html).
- Skip this step if you are using a Windows-based plan.
At the top of the Web Service page, click the
Apply link for the Server configuration to change.
The changes will take effect within 15 minutes.
- To edit the list you have made, click the Edit
icon next to the Directory Indexes option:
with spaces (e.g. index.html cgi.bin about.html).

If you are using a Unix-based plan, click the Apply
link at the top of the Web Service page.
Error Pages
Use this utility to define what will be done if a requested
page on your site is missing or fails to open for any other reason.
In order to specify your own ErrorDocuments, you need to be slightly
familiar with the server returned error codes:
Successful Client Requests
200 OK
201 Created
202 Accepted
203 Non-Authorative Information
204 No Content
205 Reset Content
206 Partial Content
Client Request Redirected
300 Multiple Choices
301 Moved Permanently
302 Moved Temporarily
303 See Other
304 Not Modified
305 Use Proxy
|
Client Request Errors
400 Bad Request
401 Authorization Required
402 Payment Required (not used yet)
403 Forbidden
404 Not Found
405 Method Not Allowed
406 Not Acceptable (encoding)
407 Proxy Authentication Required
408 Request Timed Out
409 Conflicting Request
410 Gone
411 Content Length Required
412 Precondition Failed
413 Request Entity Too Long
414 Request URI Too Long
415 Unsupported Media Type
|
Server Errors
500 Internal Server Error
501 Not Implemented
502 Bad Gateway
503 Service Unavailable
504 Gateway Timeout
505 HTTP Version Not Supported
|
To configure Error Pages, do the following:
- Select Quick Access in the Account menu.
- Click the Web Options icon on the page that shows.
- Click the Edit icon next to the domain you need.
- On the Web Service page, scroll down to find the
Error option and click the Add icon on its right.
- In the form that appears, enter the error document settings:
For Unix accounts:
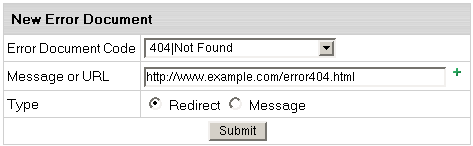
- Error Document Code: choose the one you need from the drop-down box.
- Message or URL:
the path to the page with ERROR message
IMPORTANT: if ErrorDocument 401 is chosen in Error Document Code, the path must be relative to the local user's site home root
- Type: Specify if the text in the previous field
must be treated as a URL (Redirect) or as a text
message (Message).
For Windows accounts
Users will get a slightly different form to enter the path to the custom error page.
* Note that the path should be relative to the home directory, not to the virtual host directory.

If you check "FILE":
- only static error page files can be used;
- the same error page files for this domain can be shared with other account domains.
For instance, with the following file path, all account domains will share this error page:
pages\404_error.html
- use the "\" character as a delimiter in the file path;
- do not start the file path with "\".
If you check "URL":
- it will allow you to use scripts (php/ASP) to dynamically generate error pages (alternatively, use
static error page files for each type of error page);
- error page files for this domain can't be shared with other domains;
- "Path to Custom Error page" must be relative to the virtual host and start with "/".
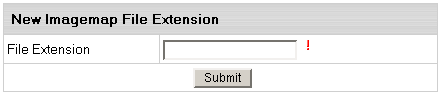
Server Side Imagemap
This feature allows your server to regard files with a specific
extension as map files. In other words, the server checks
the file with the specified extension to define the links
of an image (unlike a client-side image map, which uses the
info inserted into the HTML code) and reports back to the
browser where to go.
To add an imagemap file extension, do the following:
- Select Quick Access in the Account menu.
- Click the Web Options icon on the page that shows.
- Click the Edit icon next to the domain you need.
- On the Web Service page, scroll down to find the
Server Side Imagemap option and click the Add icon on its right.
- Agree with the charges.
- Enter the file extension beginning with a dot:
MIME Types
This utililty allows you to define file formats that are not
defined in web browsers. This enables the browser to display or
output files that are not in HTML format, just like it displays
simple text files, .gif graphics files and PostScript files.
To add a definition for your own file format, do the following:
- Select Quick Access in the Account menu.
- Click the Web Options icon on the page that shows.
- If you have several domains, click the Edit icon next to the target domain.
- On the Web Service page, scroll down to find the
MIME Type option and click the Add icon on its right.
- Agree with the charges.
- On the page that appears, enter the extension for this file type:
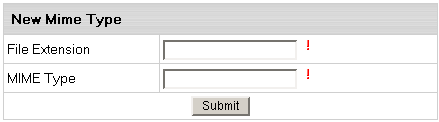
Begin file extension with a dot. The MIME type must comply
with MIME type specifications, e.g.: text/rtf or video/mpeg.
WAP Support
WAP (Wireless Application Protocol)
is a secure specification that allows users to access information
instantly via handheld wireless devices such as mobile phones, pagers,
two-way radios, smartphones and communicators. Although WAP supports HTML and XML,
the WML language (an XML application) is specifically devised for small screens
and one-hand navigation without a keyboard. WAP also supports WMLScript.
To add support for WML or WMLScript, add the following
MIME Types:
|
Content
|
MIME Type
|
File Extension
|
|
WML Source
|
text/vnd.wap.wml
|
.wml
|
|
Compiled WML
|
application/vnd.wap.wmlc
|
.wmlc
|
|
WMLScript source
|
text/vnd.wap.wmlscript
|
.wmls
|
|
Compiled WMLScript
|
application/vnd.wap.wmlscriptc
|
.wmlsc
|
|
Wireless Bitmap
|
image/vnd.wap.wbmp
|
.wbmp
|
|