Dreamweaver - Define a Site
Step 1: If you haven't already done so, create and name a folder on your disk (using Windows Explorer (Windows)that will be used as the local website folder. Each site must have a separate local website folder. Note: Do not use the Dreamweaver application folder as the local website folder.
Step 2: Start Dreamweaver. Create a new document or open an existing one and save it in the local web site folder with the file name index.html. This file will be the home page of your site. Don't worry about the contents of the file, you can change what's in the file later.
Step 3:
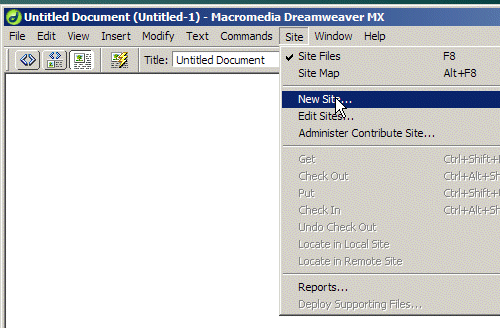
From the main screen in Dreamweaver go to Site>New Site |
 |
Step 4:
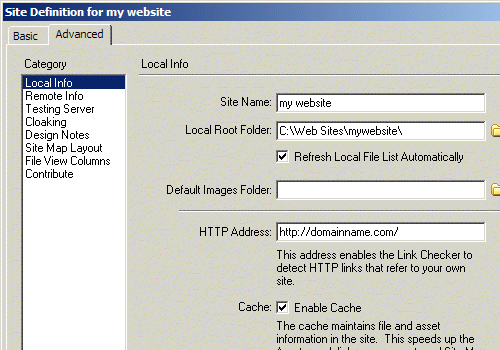
Site Name: In
the Site Name field, enter a name for the site. The site name appears
in the Site window and on the Site > Open
Site submenu. Use any name you like since it will not appear in the browser
and is only for your reference.
Local Root Folder: In the Local Root Folder field,
specify the folder on your local disk that will contain all the files
and folders for your site. Click the folder icon to browse to and select
the folder.
HTTP Address: In the HTTP Address field, enter the
URL that your remote Web site will use, so that Dreamweaver can verify
links within your site.
Cache: A site cache improves the speed of Dreamweaver
for link and site management and lets you use the Assets panel. |
 |
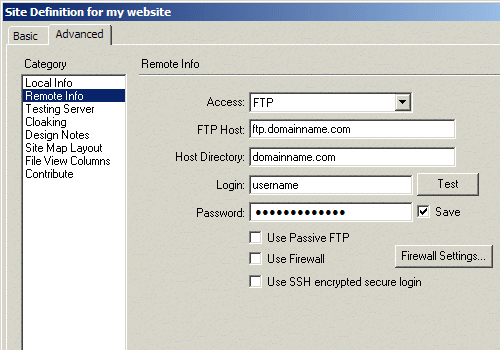
Step 5:
Access: Choose FTP
FTP
Host: This
is the ftp address of your web site. It was sent to you in your original
confirmation email. You should use ftp.yoursitename.com
Host
Directory: The folder where your files are
located on the web server. This is the same as your domain name.
Login: Your login - sent to you in confirmation
email
Password: Your password - sent to you in original
confirmation email.
Use Passive FTP: If your firewall configuration
requires use of passive FTP (which lets your local software set up the
FTP connection rather than requesting the remote server to set it up),
select Use Passive FTP.
Use Firewall: Select the Use Firewall option if
you are connecting to the remote server from behind a firewall.
Check In/Out: Check only if multiple people will
be working on this web site.
Click
OK |
 |
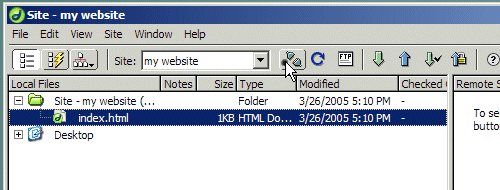
Step 6:
 When the sites window opens up click the connect button When the sites window opens up click the connect button
 To
upload files to the web site - select the file from the "local files"
and click the "put" button To
upload files to the web site - select the file from the "local files"
and click the "put" button
 to
download a file from your web site - select the file on the "remote
files" and click "get" to
download a file from your web site - select the file on the "remote
files" and click "get"
|
 |
|
|

